Showing posts with label how-to. Show all posts

Saturday, December 2, 2017

The Phillpian Star for the Nativity Fast

Such a beautiful tradition! It comes from the Slavic cultures and Eastern Europe, and is popular with many Eastern Christians. Similar to the Western tradition of Advent, the Nativity Fast (or The Phillipian Fast, or Philipovka/Filipovka) is the 40 day count-down that is marked by fasting, prayers and readings, and increasing light from the Phillipian Star: the beautiful candle holder in the center of it all. In this post I'll show you four styles my family has had, and how to use them.


In short: it is a six-sided candle holder in the form of a star, often the Star of David. A candle is lit each week of the Nativity Fast until you get to Christmas Eve and then the center candle is also lit. This evening light service is often accompanied by scripture readings, or a Jesse Tree, or some ritual that celebrates the story of this liturgical season.

This was our first Phillipian Star given to us by my eldest's godmother. I believe the men's group at the church made them as part of a workshop project with the children. It's wooden and holds standard size taper candles. You can see where the paint is worn from where I melted & chipped away the dripped wax. We put red candles at all the points of the star, and a gold or specially decorated candle in the center. Some people have many different colored candles with a theme to each week (more about that below). You can also make your own wooden taper candle holder easily; detailed how-to here

This one is not a candle holder at all. I sewed it for my little kids to do themselves without concern for fire. It's also space-saving since it hangs on the wall and doesn't take up precious counter or table top. The felt triangles and center circle (which used to have a golden design on it) adhere to the spots with velcro, and the little pocket at the bottom holds the unused pieces It folds up easily for storage till next year.

This one is pretty unique. It was made as a gift by the Sunday School/ECF teacher at church for the kids' families. Instead of a Star of David shape, it is a wooden board with an iconographic star shape painted on it with a Nativity icon in the center. The candles (either wax or battery operated) are set right on top, and each colored candle has it's own week's theme:
week 1: green, faith
week 2: blue, hope
week 3: yellow, love
week 4: white. peace
week 5: purple, repentance
week 6: red, communion
center candle: golden for the Incarnation

Here is another wall-hung example. You can see the details and instructions for this incredibly easy and affordable project here. Made from a place-mat and ribbon, it uses battery operated tea lights. I appreciate it so much since we have a small house and usable space is at a premium. I can leave it on and not be overly concerned about fire-curious children.


Your observance and use of your Phillipian Star can be as complicated or as simple as you want. The fullness of what this tradition can offer is beautiful! but only if it doesn't stress you out.
Sometimes, I can't add one more thing to the to-do list. In the years where a new child was welcomed, holidays (and life in general) got simplified a lot. We've just lit the candles, drank a warm beverage (hot cider, tea, hot chocolate), and the kids did a coloring page from the Nativity story while I read or sang something related. Other years, I made a pocket wall calendar that had an icon for every saint for every day, and also had a piece of paper with an activity suggestion on it.

Some additional links for further web-searching:
activity workbook:  https://ucymb.files.wordpress.com/2012/10/pilipivka-workbook.pdf
guide for phillip's fast for families: https://ucymb.files.wordpress.com/2012/10/st-philips-plan.pdf
ideas for the fast: http://www.sttheophanacademy.com/2011/11/living-nativity-fast.html
about in general: http://antiochian.org/nativity/pre-feast
excerpts of reflections by Thomas Hopko: http://puluka.com/home/liturgy/winter-pascha-reflections-on-phillipian-fast/


Saturday, September 14, 2013

Make an Inexpensive Waldorf Birthday Candle Ring

There is a lot to love about Waldorf inspired birthday traditions. No matter how you decide to modify and adjust things to your family needs, the focus is on an important life in your growing family and relationships. Even the focus of the table is not the cake, and certainly not the presents. The below idea & technique could be easily adapted for any kind of count-down celebration, too, like Advent or the Nativity Fast.

I really like the use of a candle ring, a circle or spiral candle holder with places for the age number of candles, and you can decide the fill the rest of the spots or not to your liking and needs.  I have seen beautiful examples of these, and many handcrafted wood ones that are well worth buying, but outside of my budget. So I decided to make one that was within my budget and skill set.


I got this wooden, blank 11.5" clock face from Michael's (also available at Hancock Fabrics), and some wooden candle cups at Hobby Lobby. (Note: those stores give a teacher discount, so don't forget your homeschool teacher id card)


I decided on candle cups that would take a standard size taper, which in the US is 7/8", because it will always be easy for me to find candles in the future. I would have preferred something smaller, but I'm trying to make this easy on myself. I used stain, sealer, and scraps of sandpaper I had left over from other projects, so the cost for the new supplies (wood pieces and wood glue) was about $13.

Many people will drill the candle holes right into the ring, but I opted to just glue wooden handle holders right on. I chose a wood glue that would accept stain just in case it became messy (which it usually does).

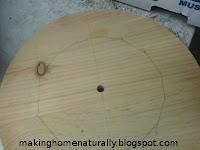
I started by marking my circle in quarters, then pencilled a rough idea of the center circle to cut out. I used my rotozip to do the cutting, and I am comfortable with the lines not being perfect -- in fact, I think it adds to the charm.


Then we took the cut pieces in and sanded them. In general, I have found there's always at least one kiddo who wants to help with the sanding, maybe more. It is so important to model and share making things by hand with your children. The center piece got sanded and added to the wood building blocks/toys.


The next part was staining it. I thought about all kinds of color schemes and ideas that would be fun, but in the end I decided to stain and seal it with things I had on hand. Reminder to self: keep it simple & fast & doable.  Note: to save time I just dipped the pieces right into the stain and then wiped off the excess. Although this did work, and was fast, it took way longer to dry than if I had just rubbed the stain on with a cloth. Then, I just glued the candle cups in place and let it dry. 


Ta da! I'm actually quite proud of the finished project, and I expect it will contribute to many celebrations in the coming years. It took less than an hour of my actual time (not counting letting things dry and set in between steps). I love how it can be arranged in many different shapes/configurations.


(It was suggested that this would make a great project as a candle holder for the various feasts and fasts of the year, especially the Nativity/Christmas Fast, or Phillips/Phillipo Fast. Simply put on the number of candle holders you need.)