I really like the use of a candle ring, a circle or spiral candle holder with places for the age number of candles, and you can decide the fill the rest of the spots or not to your liking and needs. I have seen beautiful examples of these, and many handcrafted wood ones that are well worth buying, but outside of my budget. So I decided to make one that was within my budget and skill set.
I got this wooden, blank 11.5" clock face from Michael's (also available at Hancock Fabrics), and some wooden candle cups at Hobby Lobby. (Note: those stores give a teacher discount, so don't forget your homeschool teacher id card)

Many people will drill the candle holes right into the ring, but I opted to just glue wooden handle holders right on. I chose a wood glue that would accept stain just in case it became messy (which it usually does).
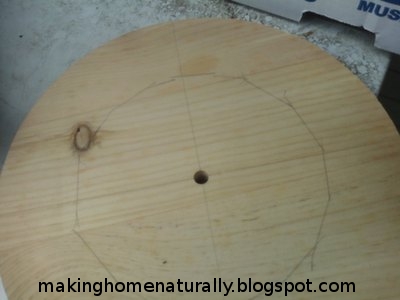
I started by marking my circle in quarters, then pencilled a rough idea of the center circle to cut out. I used my rotozip to do the cutting, and I am comfortable with the lines not being perfect -- in fact, I think it adds to the charm.

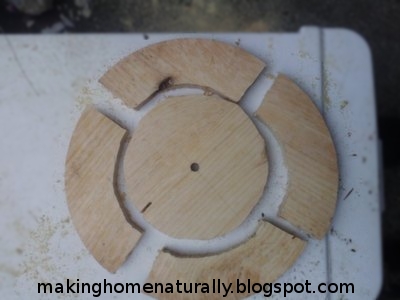
Then we took the cut pieces in and sanded them. In general, I have found there's always at least one kiddo who wants to help with the sanding, maybe more. It is so important to model and share making things by hand with your children. The center piece got sanded and added to the wood building blocks/toys.


Ta da! I'm actually quite proud of the finished project, and I expect it will contribute to many celebrations in the coming years. It took less than an hour of my actual time (not counting letting things dry and set in between steps). I love how it can be arranged in many different shapes/configurations.
(It was suggested that this would make a great project as a candle holder for the various feasts and fasts of the year, especially the Nativity/Christmas Fast, or Phillips/Phillipo Fast. Simply put on the number of candle holders you need.)
This would be a great project for a Byzantine Catholic Advent- we start the season on November 15th, so 4 candles isn't enough
ReplyDeleteThat's a great idea! You could put just the right amount of candle holders on that you wanted for your Nativity Fast, or Phillipian/Phillipo Fast. We have a fancy one in the shape of a star for our Phillip's Fast 'countdown'.
Delete